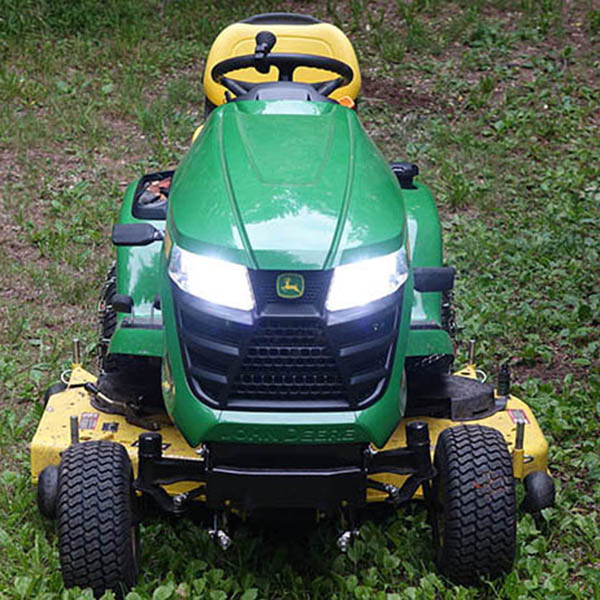
Now my Deere X350 can see & be seen at night!
My 48" Accel Deep® Deck with a mulching kit is a Zero-Discharge Mower!
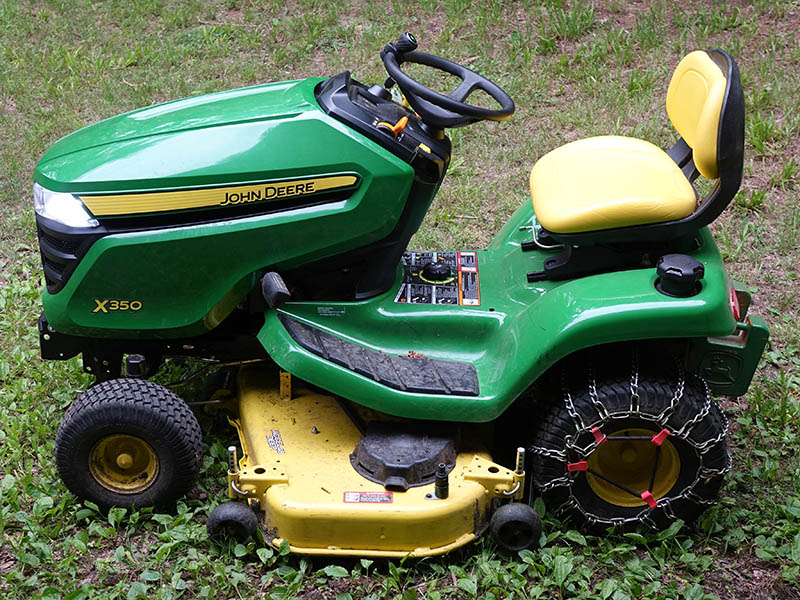
When I replaced my 30-year old rear-discharge Wheel Horse Lawn Tractor, I had difficulty finding a suitable replacement. The only rear discharge mower I found was the John Deere X350R which has a 42-inch rear discharge mower with a bagger. However, it gives less than satisfactory results without the bagger which is included whether you want it or not. I settled on a John Deere X350 with 48-inch side discharge mower and mulching kit. Then I removed the side-discharge shoot since I keep the mulching bypass closed. This is my version of a John Deere rear discharge mower and it cost $600 less than the X350R. However, many John Deere lawn tractors have serious deficiencies including my X350.
- The headlights were very dim. John Deere uses a standard automotive brake light bulb in a crude reflector. It was difficult to see and be seen by cars when working in the late evening.
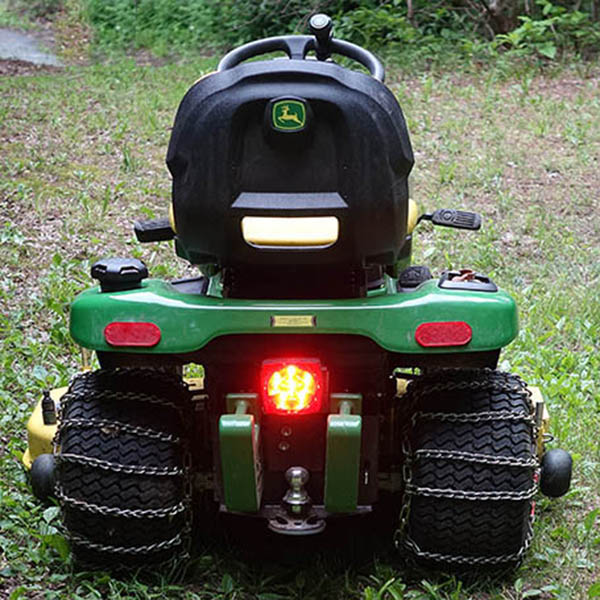
- There were no tail lights or reflectors on the back. Again, this is important when I am working near a road in the late evening and I need cars to be able to see me.
- The steering is fantastic, but it takes 2 complete revolutions of the steering wheel to turn from the left lock to the right lock. This is difficult to do quickly and slows down otherwise quick turns.
- The hitch plate is only configured for a pin hitch, and not a ball hitch, tow-rope or chain.
- The battery had an insulating shield over the positive terminal that made connecting a trickle charger very difficult without distorting the shield.
- If I put on 4 suitcase weights,, they don't slide around, but they block access to the hitch plate. With 2 suitcase weights, they would shift from side to side on hill sides and when I made turns. It wore the hitch plate where they slid and I lost a lot of the stability on hill sides I was trying to achieve by adding the weights.
All of these problems were remedied for less than $100. Listen up John Deere, you to can do this. Here is how:
1. Weak Headlights
|
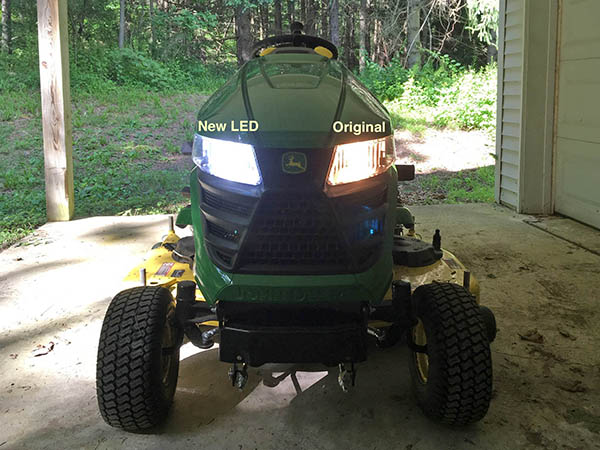
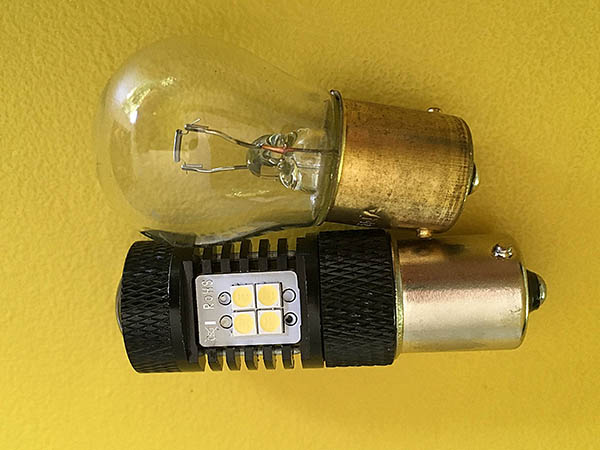
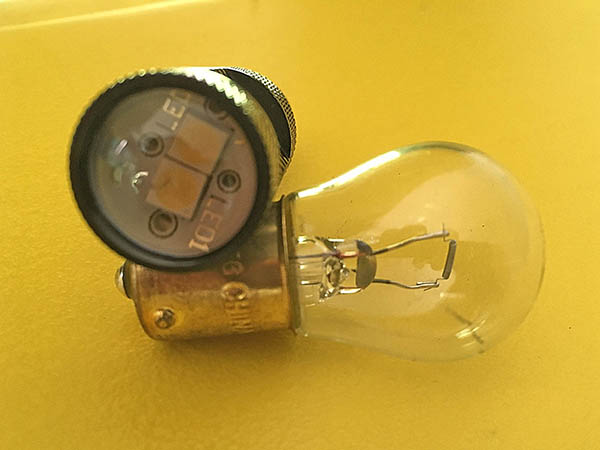
The weak headlights are understandable since they are only standard 1156 automotive brake lights. There are LED lights that fit in the same socket and use much less power and also give off much more light. With High Power LED replacement bulbs, it is much easier to see far ahead and in the immediate front.
| Lamp | Power Consumer | Light Output | Cost for pair |
| Standard 1156 brake bulbs | 26.9 Watts | 402 lumens | $4 |
| 1156-7506 LED replacement bulbs* | 6.5 Watts | 1,500 lumens | $30 |
* These are 3030 SMD High Power 1156 7506 LED Bulbs available from jdmastar.com.
Comparison of new Hi Power LED lamp with the old lamp. |
There is a trick to switching to the LED bulbs. The LED bulbs required the base center pin to be positive. John Deere wired the base center pins of the bulb holders to be negative. Hence, I had to switch the positive and negative wires on each bulb holder. However, one bulb holder tab is wider than the other to keep them from being reversed. I clipped one side of the wide tab so that I could reverse them. Then the black/white wire is attached to the tab on the bulb holder at the base end of the bulb.
2. Reflectors
|
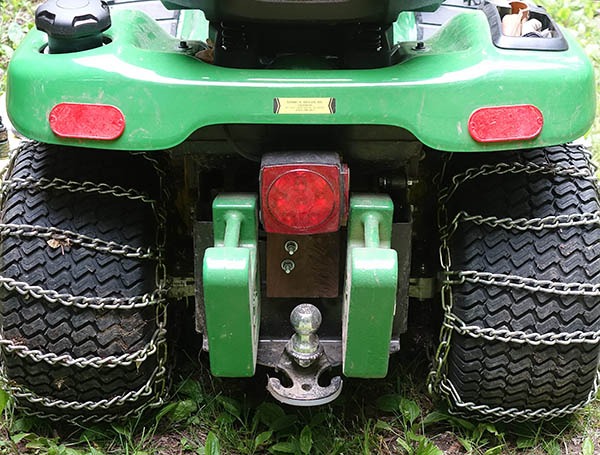
There were no lights or reflectors on the rear of the John Deere tractor. I simply bought a pack of 2 stick-on reflectors* from Harbor Freight for $3 for the pair. I will discuss the tail light in the section on Suitcase Weights.
* There are Haul-Master - Item #98395 from Harbor Freight.
3. Steering
|
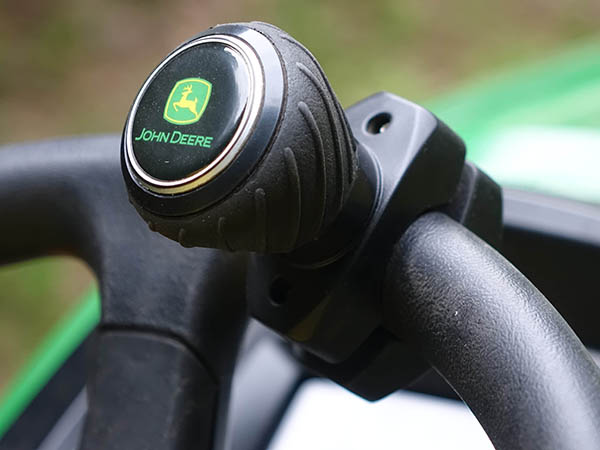
I really like my John Deere's very small turning radius, but it takes 2 complete revolutions to turn from the left lock to the right lock. It also takes two hands. On side hills, I am using one hand to position myself on the uphill side of the seat for comfort and stability. (I had to disable the seat switch to permit sitting on the uphill side of the seat while mowing.) Being able to turn the steering wheel quickly with one hand was easily facilitated with a spinner knob on the steering wheel. I treated myself to a John Deere Spinner Knob* for $16. It has a hard rubber mount that doesn't damage the steering wheel.
* The John Deere Spinner Knob is John Deere Part: TY26583.
4. Hitch Plate
|
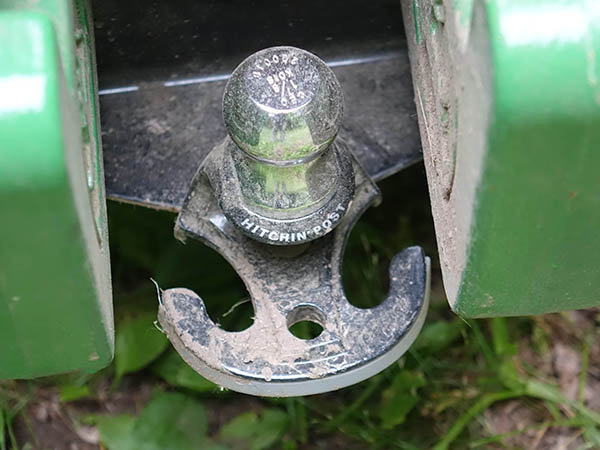
With my Wheel Horse, I used a small utility trailer that has a ball hitch. Also, I like to be able to move trailers with my lawn tractor. My other attachments had pin hitches. Frequently I used the tractor to pull things with tow-ropes or chains. The John Deere only had a pin hitch. This is easily remedied with the Good Vibrations 3-Way "Hitchin Post"* which cost me $25. The ball is extra. When using a ball hitch, get one with a 3/4 in. shank diameter, and 1-3/4 in. shank length. If the shank is longer, it won't fit.
The Good Vibrations 3-Way "Hitchin Post* is available from Tractor Supply Company.
5. Battery
|
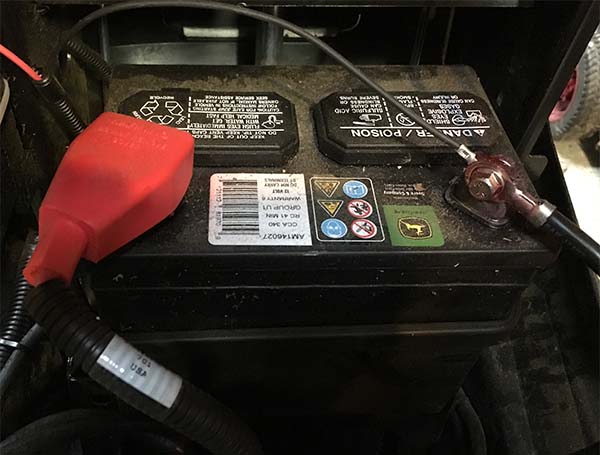
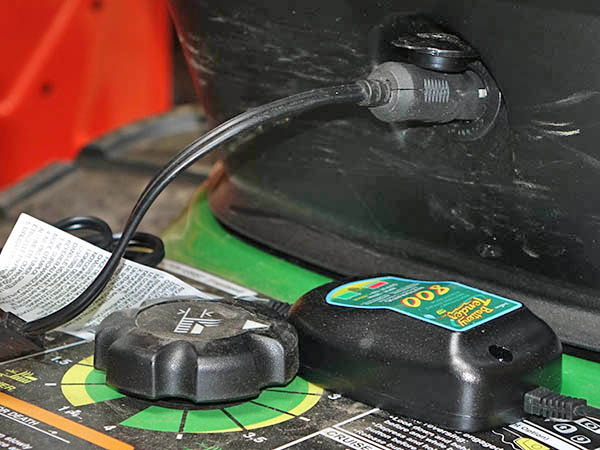
When I store my lawn tractor for a month or more I always connect a trickle charger to maintain the battery. In the winter, I always use a trickle charger to keep the battery from discharging. This is extremely important since once a battery discharges it can freeze. Freezing will destroy a battery. With the insulating shield John Deere uses on the positive terminal it is difficult to repeatedly attach charger cables without eventually damaging the insulating shield. It is easy to attach charger cables to the battery using the John Deere Power Port Outlet Kit* that fits into a built-in hole below the steering wheel with a pop-out plug. It makes it easy to plug in the cigarette-lighter type plugs. Fortunately, it is not connected to the battery through the power switch, hence, when the tractor is in storage the Power Port Outlet can be used to connect a trickle charger. Most trickle chargers come with a plug type connector which plugs right into the John Deere Power Port Outlet. My power outlet kit cost $14.
* The John Deere 12-Volt Power Port Outlet Kit is part # BM24915.
6. Suitcase Weights & Tail Light
|
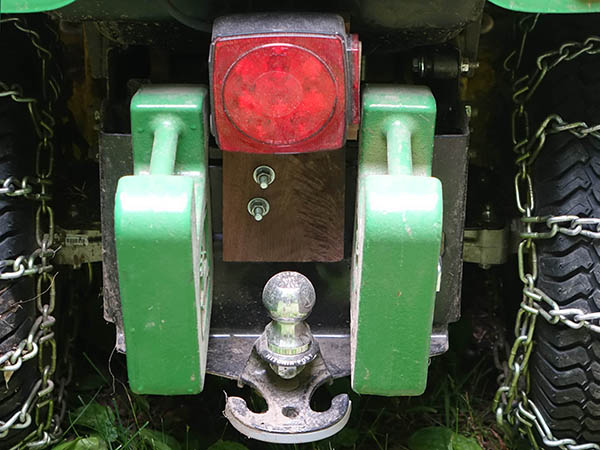
Since I both mow grass and plow snow on side hills, I keep a pair of chains and 2 suitcase weights on all year. With the 48-inch mower this is no problem; there is plenty of clearance for the chains. The problem I did run into is that with just 2 suitcase weights, the weights slid from side to side as I turned and went on side hills. With 4 weights, they wouldn't slide but I would lose the functionality of the hitch. The sliding was easily remedied by bolting 2 pieces of wood to the hitch plate between the two weights, one behind the plate and one in front of the plate. I used pieces of scrap lumber, so this didn't cost anything.
The wood board between the suitcase weights provided an easy place to mount an LED tail light. I purchased a .25 Watt LED tail light* from Walmart for $19. I could have easily plugged the LED tail light into the Power Port Outlet in the Battery section above, but that would have meant having a cord stretching in my way and it would need a switch to keep from being on all of the time. I elected to connect the LED tail light to the terminals for the right headlight. The two LED headlights and LED tail light resulted in power consumption dropping to only 1/3 of what it was originally, so power consumption is not a concern. More light and less power consumption is a great improvement. Connecting the tail light to the right headlight provided automatic switching of the tail light with the headlights. To connect to the right headlight, I had to make a set of connectors to break out power for the tail light and then run a wire from the right headlight to the new LED tail light. This was not trivial, but I strapped this wire to existing cable runs to avoid making any changes to the cabling layout. I started going back along the headlight cabling and ended up going back along the seat-interlock-switch cabling. Then it was just a short run above the gas tank to the LED tail light. I used a length of black oil-resistant CPE jacketed 16 AWG/2 stranded copper duplex (SJOOW) wire I purchased from Ace Hardware. It worked great and blended in with the John Deere cabling.
* Blazer, 6-Function, LED, Submersible, 7-Diode, Red-Lens - Passenger-Side, # C7493RTM Trailer Tail Light from Walmart for $19.
The result:
|
The result is all problems were solved for less than $100. For an additional $19, I added a tail light for increased visibility to passing cars when I am plowing snow in the winter.
| Hi-Power LED replacement head lights | $30 | pair | jdmastar.com |
| Rear Reflectors | $3 | pair | Harbor Freight |
| Spinner Knob | $16 | each | John Deere |
| 3-Way Hitchin Post | $25 | each | Tractor Supply Company |
| John Deere BM24915 Power Outlet | $14 | each | John Deere |
| Scrap Pieces of Wooden Board | free | ||
| Blazer C7493RTM LED Tail Light | $19 | each | Walmart |
| Total | $107 |
Power consumption for the headlights and new taillight dropped from 26.9 watts to 6.75 watts and visibility increased by a huge factor.
Return to top
My 48" Accel Deep® Deck with mulching kit is Zero-Discharge Mower!!
My 30-years experience with the Wheel Horse rear discharge mower had spoiled me. No clipping being blown into flower beds, on walks, or into the road. Without the proturding side discharge, I could mow right up to the sides of objects such as trees, mail boxes, fences and boulders. When clippings got so heavy, that they could smother the lawn if left, I could tow a very inexpensive lawn sweeper while I mowed and still have all of the advantages of a rear discharge mower.
The John Deere Zero-Discharge Mower
When I bought the John Deere X350 with 48" Accel Deep® Deck side-discharge mower with mulching kit, I assumed I was getting essentially a rear-discharge mower. What I got was a Zero-Discharge Mower. So far, even under worst case condition, I never see any brown clippings. They are chopped up so fine that they disappear into the turf before they turn brown. Before, when we had a picnic, I used to mow every 5 days for at least a month to get control of the clippings and make the lawn look good. Now, even after 3 weeks, I mow it once and it looks good enough for a picnic with out any brown clippings showing up.
I hope this is of help to someone else.
You are invited to visit the Henning's other websites.
You mail contact the webmaster at webmaster@rhodyman.net
Last Updated: April 6, 2018