|
|
Feature |
IBM PC |
Macintosh (128k) |
| Chip | Intel 8088 8/16 bit | Motorola 68000 16/32 bit |
| Speed | 4.77 MHz | 7.78 MHz |
| RAM | 256K (64K addressed) | 128K plus 64K |
| ROM Expansion | 1 or 2 slots | None |
| Floppy Disk | 360K 5.25 inch | 400K 3.5 inch |
| Screen | Low resolution color | Medium resolution b/w |
| Learning time | 15 to 30 hours | 2 to 4 hours |
The "fat Mac" (512k Mac) gave hope for the Mac becoming
a powerhouse and proved that Apple might pursue a policy of upward
compatibility and upgrades. The MacPlus further demonstrated the
policy of upward compatibility and of upgrades. It also brought
out the SCSI port which provided a fast port to external hard
drives. Mac's strengths were in desk top publishing, where it
stole the market, and in networking. Also the closed architecture
made sure that programs would work on all Macs and not just ones
with certain expansion boards.
 Macs
Niche In The Wintel World
For many years, Microsoft used many items produced on Macs since Windows had very limited graphics capabilities. Here are some of the things created on Macintosh for the Windows/Intel World:
- The Win95 logo was created with FreeHand on a Macintosh.
- IBM's Aptiva point-of-purchase materials and the boxes they ship in.
- IBM office building in Victoria, BC, Canada was designed on a Mac.
- Intel's Flying Pentium Ads (rendered with Electric Image)
- The graphics for Sun Microsystems web site.
- The graphics for Microsoft Network.
- IBM's print advertising.
- Gateway 2000's print advertising.
- Dell Computer's print advertising.
- Midwest Micro's print advertising.
- Outdoor advertising for Microsoft Magazine.
- Print advertising and materials for Microsoft.
- Windows95 packaging.
- Advertising for Microsoft in Sweden.
- Italian advertising campaign for Win95
- PC Magazine.
- PC World magazine.
- Windows Magazine.
- Windows Sources magazine.
- Computer Shopper magazine.
- Visual Basic Magazine.
- The weekly Microsoft internal newsletter MicroNews.
- Many television spots are edited with Avid (a Mac based digital video system), including the IBM and Microsoft spots.
- The multimedia for the Windows 95 launch was controlled by
Dataton Trax, software that runs on a Mac.
 My Backup Strategy
A Belt and Suspenders Approach to Backups
A person really can’t afford not to have a good backup if they keep anything of value on their Mac. If you have ever lost your main hard drive, you realize how much you take for granted: email addresses, email, internet addresses, pictures, software, lots of settings, and a zillion files that you forget that you rely on.
The Price Is Right
 External hard drives are very cheap now. A 500 GB hard drive is less than $100. Backup software cheap also. Carbon Copy Cloner is freeware, but SuperDuper! is $28 shareware and is twice as fast. Time Machine is included with Mac OS X 10.5.
If you don’t keep a backup, you can spend weeks just getting your computer so that it is useable after a computer crash or a hard drive crash.
Thank You, Time Machine
 I use Time Machine, which comes with Mac OS X 10.5. After an initial complete backup, Time Machine makes hourly backups of all files that have changed since the previous backup except for working files like caches that don’t need to be saved. You can have it ignore any files, but I have it back up just about everything. Time Machine was buggy and quirky when it first came out, but since then I have been using it continuously for about 6 months and haven’t had any problems.
The main times I have needed Time Machine to restore a file was when I updated software and found that the update didn’t work with my old files and that the new software had removed the previous version that did work. I just deleted the new version and had Time Machine restore the old version.
I have 180 GB of files on my 250 GB internal hard drive. The first Time Machine backup took 16 hours. Subsequent hourly updates just take minutes. I use a 1 TB external drive for my Time Machine backup disk. However, the Time Machine backups of the 180 GB of data on my 250 GB internal drive only take about 225 GB on the external Time Machine disk. I probably could have easily gotten by with a 500 GB drive.
My Data Preservation Strategy

 Before I did the either the Mac OS X 10.5.5 or 10.5.6 update, I backed up my 250 GB internal hard drive to a 250 GB external FireWire hard drive. That took 5 hours with SuperDuper! With Carbon Copy Cloner it took 10 hours. Then, I ran Disk Utility to repair all permissions on my internal hard drive as Apple recommends before installing updates. Then, I ran Onyx, a freeware utility, to run all Mac OS Maintenance routines and clean up caches and other files that accumulate.
I have a 350 GB external drive that I use as a backup for Time Machine. However, rather than backup the Time Machine drive, I just have Time Machine treat the 350 GB as a Time Machine Disk and just backup the files for me. That took 16 hours the first time, but subsequent updates go much faster. Time machine has absolutely no problem having several different backup disks.
My Goals
To prevent data loss, my goals are:
 Always have a bootable backup from a time that the computer was working well that could be run from any Mac in case my Mac crashed and I had to buy a new one or my internal hard drive crashed and it had to be replaced.
- Have hourly updates to all files that have changed.
- Keep the bootable backup and a Time Machine backup off premises in case of theft or fire. I have access to a fire-safe nearby.
My computer has a 250 GB drive with 180 GB of files.
My Tools
 The backup tools I use include:
- 3 external hard drives:
- a 250 GB FireWire drive as a bootable backup, stored off premises
- a 1 TB USB drive as a Time Machine drive (Apple Time Capsule)
- a 350 GB USB drive as a backup Time Machine drive stored off premises
- Backup Software: SuperDuper!, but Carbon Copy Cloner works also, but is slower.
- Time Machine: it is included free with Mac OS X 10.5
Bootability
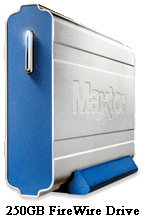 FireWire bootable drives are great in giving you immediate access to your system. However, it is somewhat time consuming to make a bootable backup. In my case it takes 5 hours with SuperDuper! I have a PowerPC Mac and only FireWire drives can be made bootable. [I was informed by our MacUser Group President, Shirley Hershey, that unfortunately, not all FireWire drives are bootable and it’s not always easy to determine which are and which aren’t. Most Maxtor drives are bootable but that’s not always the case with Western Digital FireWire drives. If in doubt, check with the manufacturer.] It is my understanding that with Intel Macs that USB drives can also be made bootable.
Time Machine is very easy to use to restore files. It runs unnoticed in the background until you need it to restore files. It is not bootable and is not very practical to restore all files.
Safety With Redundancy
The combination of a bootable FireWire drive and Time Machine guards against all eventualities that I can foresee.
Using this strategy I had absolutely no difficulties in doing either the Mac OS X 10.5.5 or 10.5.6 update and had the confidence that I could go back quickly if it didn’t work.
Recovery Tactics
 If a person has fixed a drive failure or a computer failure, or a bad software install that has lost all files on the internal hard drive, they can easily recover. To recover their files they can boot from the external bootable hard drive by holding down Commend-Option-Shift-Delete while the computer is booting up. Then open SuperDuper! to restore the internal hard drive from the external hard drive. Then boot from the internal hard drive and use either of the Time Machine drives to restore individual files that are newer than the bootable backup.
The second Time Machine drive is probably unnecessary, but it gives an added degree to security in case of a failure of the primary Time Machine drive or if it is stolen or lost in a fire. Also, I had the drive and wanted to use it.
 Backing up in Word.
 Home
Network For Two Macs
Home Network For Two Macs
The fastest way to network two Macs is via a cheap ethernet network. I was able to network my Duo and G3 by following the directions at http://www.macsonly.com/ethernet.html. The following are my adaption of these directions.
Hardware
The G3 has a 10/100 Ethernet Port.
For the Duo Dock, I bought an Asante Mac Con I Nubuss Card from MacConnection on 1/22/99 for $82.
Then I connected the computers via an ethernet crossover cable.
Software Requirements
I have Mac OS 8.5 on my G3 and Mac OS 7.5.5 on my Duo.
A. Installed and Enabled on Both Computers:
1. Control Panels
· AppleTalk
· File Sharing (Sharing Setup in System 7.5)
· Users and Groups2. Extensions
· AppleShare
· Ethernet (Built-in) or Apple Built-In Ethernet
· File Sharing Extension
· File Sharing Library
B. Control Panel Configuration on Both Computers:
- Make sure both computers are connected and both are turned on.
1. AppleTalk -- Follow these steps on the older Mac and then repeat them on the Mac G3.
- Select Apple Menu->Control Panels->AppleTalk
- A dialog box may come up saying AppleTalk is inactive and asking if you want it to be active when you close the control panel. Click "Yes".
- Select Edit Menu->User Mode and click the "Advanced" button and click "OK".
- Click the "Options" button, "Active" and "OK".
- Select "Ethernet" in the "Connect via:" popup menu at the top of the AppleTalk control panel and wait a moment for it to set up.
- Select File Menu->Quit and click "Save" in the ensuing dialog box. Wait while the AppleTalk connection is opened.
- Repeat these steps on the Mac G3
2. File Sharing (Sharing Setup in System 7.5) and Users & Groups-- Follow these steps on the older Mac and then repeat them on the Mac G3.
- Select Apple Menu->Control Panels->File Sharing (Sharing Setup in System 7.5)
- Click on the "Start/Stop" tab and enter your name, a password and a name for your computer (e.g. "Old Mac" for the older Mac or "Mac G3" for the Mac G3). Use different names for yourself on each computer (e.g. "William" on the older Mac and "Bill" on the Mac G3 but you can use the same password if you want.
- Click "Start" for File Sharing and Program Linking
- Click the "Activity" tab to see the windows that will show the connection and what's being shared when the network is active.
- Select Sharing Menu->Open Users & Groups and you should see "your name" (e.g. "William" if older Mac or "Bill" if Mac G3) as owner and a "Guest" listed.
- Click the "New User" button
- Select "Identity" from the "Show" popup menu at the top (it may already be selected)
- Type in "your name" to be entered in the Mac G3 (e.g. "Bill") [Type in "your name" (e.g. "William") entered in the older Mac when configuring the Mac G3]
- Type in the password and check "Allow user to change password".
- Select "Sharing" from the "Show" popup menu and check "Allow user to connect to this computer" and "Allow user to link to programs on this computer"
- Close the "New User" window and you should see "your name" (e.g. "Bill" if configuring older Mac or "William" if Mac G3) on the other computer now also listed on the Users & Groups control panel.
- Quit the Users & Groups control panel and quit the File Sharing (Sharing Setup in System 7.5) control panel
- Repeat these steps for the Mac G3.
3. Sharing Hard Drives Set Up
- On the older Mac, highlight the hard drive and Select File Menu->Sharing
- In the dialog box check "Share this item and its contents"
- From the User/Group popup menu select your name on the Mac G3 (e.g. "Bill") and from the Privilege popup menu select "Read and Write" and close the window.
- On the Mac G3, highlight the hard drive and Select File Menu->Sharing
- In the dialog box check "Share this item and its contents"
- From the User/Group popup menu select your name on the older Mac (e.g. "William") and from the Privilege popup menu select "Read and Write" and close the dialog box
Making the Ethernet Connection
1. If the first time, reboot both computers, this may not be necessary on every computer, but it minimizes the chances of problems. For subsequent times, just startup both computers.
2. Open the AppleTalk control panel on both computers to be sure AppleTalk is active and "Ethernet" is selected in the "Connect via" popup menu. Quit the control panel and click "save" if asked in a dialog box.
3. Open the File Sharing (Sharing Setup in System 7.5) control panel on both computers and under the "Start/Stop" tab be sure that File Sharing and Program Linking are "On". Click on the "Activity Monitor" tab and leave the control panel open.
4. Open the Mac G3's Chooser by selecting Apple Menu->Chooser and check to make sure the AppleTalk "Active" button is pressed.
5. Click on the "AppleShare" icon. You should see the name of the older Mac (e.g. "Old Mac") appear in the "Select a file server" window. Highlight it and click the "OK" button.
6. In the dialog box that comes up, enter your password.
7. In the next dialog box you should see the internal hard drive of your older Mac listed. Highlight it (check the box if you want this to happen automatically every time you startup your computer, i.e. you want a permanent network), click "OK" and it should appear on your Mac G3's desktop. Quit the Chooser.
7a. Open the older Mac's hard disk on your Mac G3's desktop and copy the files that you want to your Mac G3s hard disk. If this is all you ever want to do with your ethernet network, you're done!
8. Open the older Mac's Chooser by selecting Apple Menu->Chooser and check to make sure the AppleTalk "Active" button is pressed.
9. Click on the "AppleShare" icon. You should see the name of the Mac G3 (e.g. "Mac G3") appear in the "Select a file server" window. Highlight it and click the "OK" button.
10. In the dialog box that comes up, enter your password.
11. In the next dialog box you should see the internal hard drive of your Mac G3 listed. Highlight it, click "OK" and it should appear on your older Mac's desktop. Quit the Chooser.
12. Your two computers are now networked and you can use all the files and programs on both computers from either computer. You can see who's connected and what's being shared in the File Sharing (Sharing Setup in System 7.5) control panel under the Activity Monitor tab. You can also change the privileges and add more users with different privileges. Read all about it in the finder's Help Menu->Help under the "Sharing Files" topic.
Troubleshooting
In the finder, choose Help Menu->Help. Click the "Topic" button. Select "Sharing Files".
 Links
to Macintosh Web Locations
- Apple Computer
- Apple Insider
- Ambrosia
- MacAssistant Tips and Tutorial Newsletter
- Mac@LehighValley Macintosh Users Group of the Allentown, PA area
- Mac Cyberdog
- MacFixIt Download Library
- Mac Fog City Software
- Mac HP
- Mac Internet Explorer Home Page
- MacInTouch Home Page
- Mac Netscape
- Macintosh News at MacCentral
- Mac News Network
- Macintosh Times
- Mac Orchard
- Mac OS Rumors
- Mac RealAudio
- MacReview Zone
- Mac Share
- Mac Shareware & Freeware
- MacSpeed Zone
- Mac Supra InfoBahn
- Mac Synergy Software
- Mac TidBITS
- Mac Times Network
- Mac Version Tracker
- MacWEEK
- Macworld Online
- MAC ZD Net Macintosh
Directory to Contents of Henning's Websites
 |
I am webmaster for the following websites:
- Henning's Home Pages
- Henning's Rhododendron & Azalea Pages
- Henning's Scouter's Pages
- HMC History Book: On My Honor - The Hawk Mountain Council Story ... 1908-2010
- IFSR - International Fellowship of Scouting Rotarians
- Mac@LehighValley Macintosh User Group – in Macungie, PA
- MyDeere - Fixing shortcomings of my John Deere lawn tractor
- RCL History - Rotary Club of Lancaster History Project
- Reading Works - Western Electric/Bell Labs
- Rotary International
- Save The Azaleas at the U.S. National Arboretum
- Site Traffic Report & Ad Policy
- Tricks of Experienced Travelers
- Tyler Test Garden
- WCV Nature - Woodcrest Villa Nature Trail and Arboretum
Site Traffic Report & Ad Policy
My interests include the following:
- Beavers – our mascot in Oregon and Pennsylvania
- Boy Scouts of America - Hawk Mountain Council, Reading, PA
- Genealogy - The Henning Family Tree
- Gov. Mifflin Junior High School - Learn To Live ... Live To Learn
- Gresham Class of '59 – Darlene's class
- IFSR - International Fellowship of Scouting Rotarians
- Jefferson Class of '58 – Steve's class
- Macintosh Computers - Mac@LehighValley Mac User Group
- Reading, PA – and the surrounding Berks County
- Reading Works (Western Electric/Bell System/AT&T/Lucent/Agere/agone)
- Reading Bell Labs Alumni Reunion - September 29, 2007 (pdf)
- Rotary International - Kutztown Rotary Club
- Travel - Tricks of Experienced Travelers
- Volvo Cars – we bought 7 in Sweden and 5 more in the US
My Photo Albums
- Photos of Rhododendrons Taken for the Hirsutum Website
- Photos Published in Books, Magazines and Journals
- Native Flower and Plant Pictures taken April 22, 2000
- Native Flower and Plant Pictures taken May 13, 2000
- Photos Taken in Northern India in March 2010
- Photos Taken in Southern Chile in December 2010
- Photos Taken in Scandinavia in 2011
- Photos from the 2013 BSA Jamboree taken on July 22
- Photos taken on Easter Island in 2014
- Photos Taken in Antarctica in 2014
- Photos Taken at the American Rhododendron Society European Convention in 2018
- Photos of Rhododendron Taken in Europe in 2018
My Favorite Links
- Berks County, Pennsylvania
- Macintosh Computers
- Mobile Websites
- Photography
- Reading, Pennsylvania
- Rhododendrons and Azaleas
- Rotary International
- Scouting
- Travel
- Others
 |


